|
BaltradDex
BALTRAD Data Exchange System
|
|
BaltradDex
BALTRAD Data Exchange System
|
Assuming that your Tomcat server is installed on local machine and listening on port 8084, in order to run the application, open a web browser and type the following in the address bar:
Sign in typing your user name and password in the textbox available on the login screen. During installation, default administrator's account is created with user name admin and password baltrad.
In order to sign out, use Logout link available in the upper right corner of each page.

It is important for the user to change the default password set by system administrator. In order to change the password, click Password option located in Settings group of the left-column menu. User will be presented with a page allowing to modify the password.
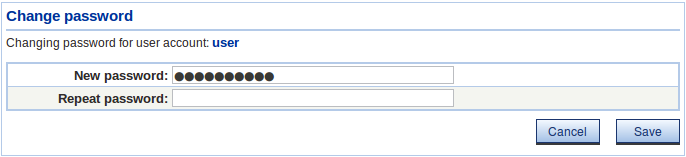
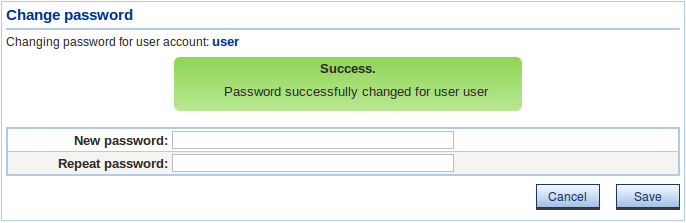
Enter new password, confirm it by typing the password again and click Save. System will display a message confirming that password has been changed. From now on new password will be used in order to sign in.
In order to configure a fully functional system ready to exchange data, several things have to be done.
First thing to do is to configure node properties. Since setting node properties require administrative privileges, it is necessary to sign in as user admin. Once signed in, click Node settings option from left-column menu.
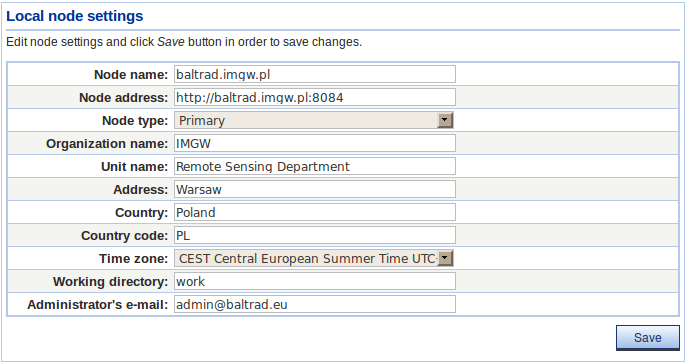
The most important settings are Node name and Node address. Make sure that these settings are correct before configuring data exchange.
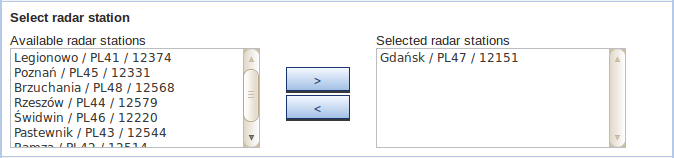
BaltradDex provides radar interface which allows to access data from a given radar station. Radar interface is not used directly - it is selected as a basic parameter of data source (see the next section). In order to configure radar, click Radars item in the main menu. Menu will expand showing available options. Click Add option. Next, select desired center from the list on the left by clicking on the center identifier. Identifiers have the following form: Country code - GTS code - center number. Once clicked, the box on the right reveals the list of radar stations available for a given center. Radar station names are presented in the following form: Place - radar code - WMO number. Click Save button to save radar configuration.

Show option from Radars menu to display the list of currently configured radar stations. Remove option will delete selected radars. \endnote
Next step is configuration of data sources. Data source is an interface allowing to access data injected into baltrad node from local production system. Data available with a given data source must exactly match its parameters.
Click Data Sources option in the main menu and Add. At the top of the page, fill in the textboxes providing a significant data source name and description like in the example given below. Typically, data sources are named after radars, including some additional parameters, like data type in the example below.

Next scroll down to radar selection box. General rule for setting data source parameters is to add parameters from left options box to the right. Select a parameter in the left options box, then use button marked with > sign in order to add the parameter to the options box in the right. Use < button to remove unwanted parameter. Select one or more radars according to your needs. Typically only one radar is selected for a data source, but more radars is still possible. Remember that data files coming from these radars will be available with this data source.
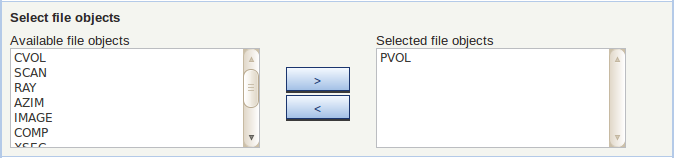
Scroll the page down. Next step is selection of file object according to ODIM_H5 model specification. Select file object from the left options box and use > button in order to add it to selected options box, just like in the previous step. It is possible to select more than one file object. In such case all selected objects will be available with this data source.
Scroll the page to the bottom. Last step of data source configuration is selection of users for which this data source will be available. This means that users selected at this stage will be able to subscribe the data source and will receive data matching its parameters defined in the previous steps.
peer (typically used for data exchange) are created automatically upon first incoming connection. It is possible however to configure data source with no user accounts assigned and add given account as soon as it is created. 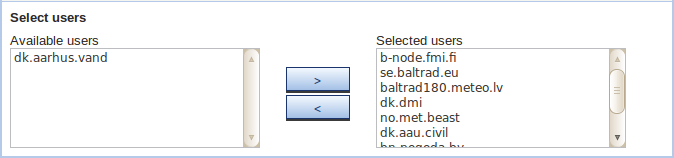
Once the above steps are completed, press Save to store data source configuration. User will be redirected to status page indicating whether saving of data source was successful. Clicking OK in the status page will take user to data source selection page.

Edit and Remove options available in Data sources menu in order to modify data source parameters or delete data source from the system. Note that in case when name of existing data source is modified, it will be saved as a new data source. In order to get data from local production system into BALTRAD node, it is necessary to configure injector software which will deliver data to the node. Because each incoming file/message is authenticated, it is required that injector software provides its public key in order for the node to be able to authenticate incoming file/message. If you are running injector software like OdimH5 or other software that doesn't have it's own tool for exporting the key, you can use a key import tool available in script directory of BaltradDex package.
Prior to using key import script, make sure that you have Python's psycopg2 module installed in your system. Under Ubuntu linux, you can install this module with the following command:
$ sudo apt-get install python-psycopg2
In order to test the script, execute the following command:
Assuming that all necessary modules are in place, the script will display usage information. Once the module is installed, you can imort the key either from local or remote machine, depending on where the injector is supposed to run. Following is the example of importing key from local machine (injector runs on the same machine as the node software itself):
In the example above, the following parameters have been used:
--key - path to the source key directory
--dst - destination directory, typically BALTRAD keystore folder as shown above
--dbuser - database user, in this case we're using a default user
--dbhost - database server address, localhost used here
--db - database name
--pwd - database password
Once the script is executed, the key will be copied to the destination directory and its metadata will be stored in the database. It is also possible to import the key from remote machine available with SSH. Here's an example.
There are 2 additional parameters applied:
--user - remote host's user name
--host - remote host IP address
Assuming that injector's key has been successfully imported, you should see a message like the following.
Copying the key from /opt/baltrad/odimH5/.keystore/rainbow.imgw.pl.pub  ...
... OK.
Calculating key checksum ...
... OK.
Storing key in the database baltrad ...
... OK.
The last step is telling the node which messages are coming from the injector (in contrast to the messages coming from the peer node).
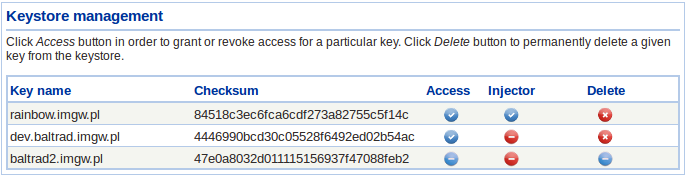
Click Keystore from the Settings menu group. You will be presented with a list of keys available in the keystore, as shown in the image below.
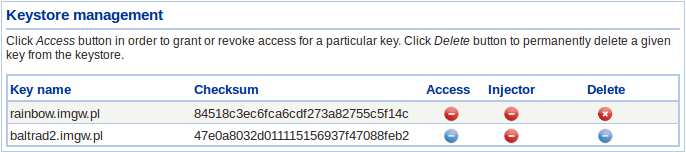
Each key in the keystore has an option called Injector. If this option is set to on, node will be aware that messages that are authenticated using this particular key are coming from an injector.
According to the previous example, Injector option should be set to on for the key that has been imported from the injector. In order to achieve this, click Injector button next to the selected key entry. Red icon will turn blue, indicating that the given key has been set to injector.
Independently of identifying a key as injector, in order to let the files through authentication process, access should be granted for the key. To do this, click Access button so it turns from red to blue. In the image below key named rainbow.imgw.pl.pub is configured as approved injector's key.
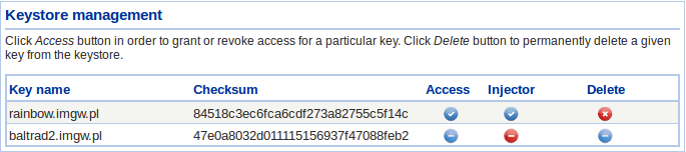
From now on node should be able to successfully authenticate messages coming from the injector.
Every message arriving in BALTRAD node is authenticated using private/public key pair. In general, outgoing message is signed with node's private key and incoming message is verified and authenticated with public key. According to this approach, for communication to take place, local node's public key has to be available in the peer node's keystore and vice versa.
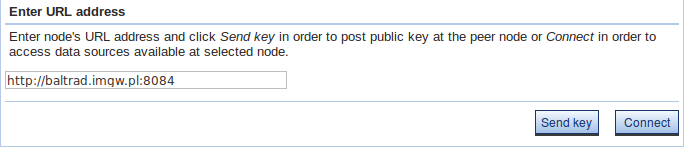
Therefore, before connecting to peer node, local node's public key has to available in peer node's keystore. In order to send your public key to the peer node, click Connect option located in the Exchange group in the main menu. Type peer node's URL address in the edit box and click Send key button.
In case the key was successfully sent to the peer node, user will be informed with the following message:

In case when the key already exists in the peer node's keystore (e.g. has already been sent earlier), the following message is shown:

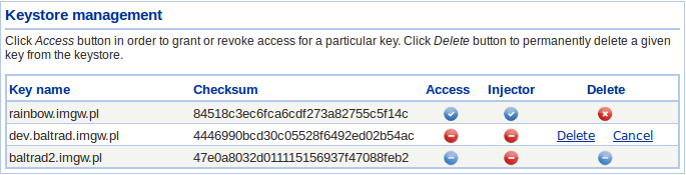
Once local key has been sent to the peer node, peer node's administrator has to approve a given key. In order to access the keystore, node's admin clicks Keystore option from the Settings group in the menu. Keystore content will be presented as in the image below.

Once the key has arrived, next thing is granting access for this key. In the following example, dev.baltrad.imgw.pl is the incoming key, while baltrad2.imgw.pl is local node's public key.
To grant access for the selected key, click Access button next to given key entry. Red icon turn blue, indicating that access for the given key has been granted.
From now on the system will let throught every incoming message that can be successfully verified with this key.
In order to revoke access, click on the same icon once again. It will turn red again and access for the selected key will be revoked.
Keystore management page allows to remove peer's key permanently. To remove selected key click Delete icon next to given key entry. Once clicked, icon reveals dialog asking user to confirm key deletion. Click Delete button to remove key permanently from the keystore, or Cancel button to get leave the key in the keystore.
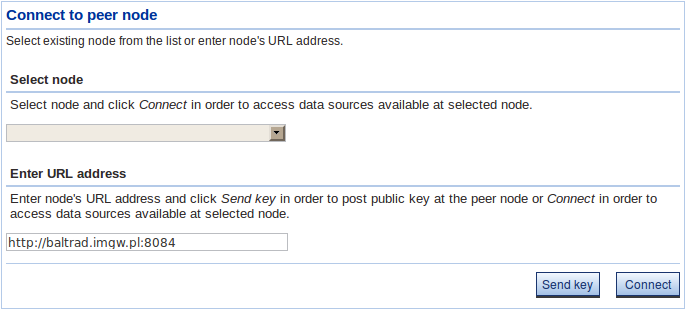
Basic BaltradDex functionality allows to connect to peer node and access and subscribe data sources available for a given user. In order to connect, sign in to BaltradDex, click Connect option from Exchange group in the main menu. Assuming that connection to a given node is made for the first time, type node address in the text box Enter URL address according to the example below.

\endnote
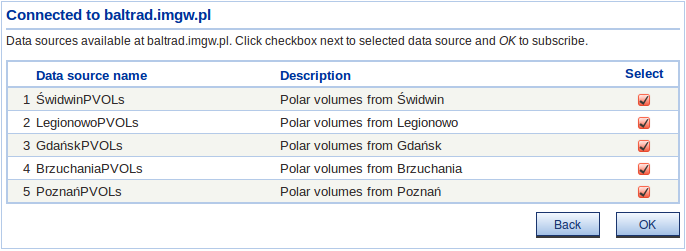
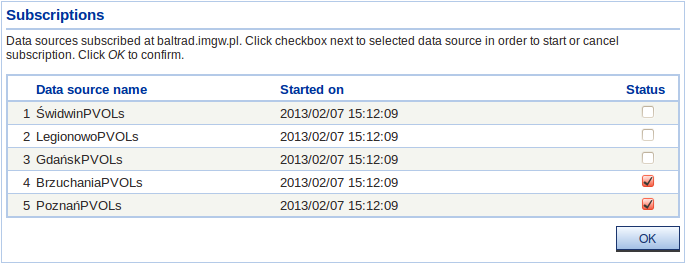
Clict Connect. Upon successful connection, peer node will render the view with a list od data sources available for the user to subscribe (see the image below). In order to subscribe a given data source, click a checkbox next to data source name and description. Once selection is made, click OK. The system will ask to confirm the selection by clicking OK on the next screen and submitting subscripions request at the peer node.
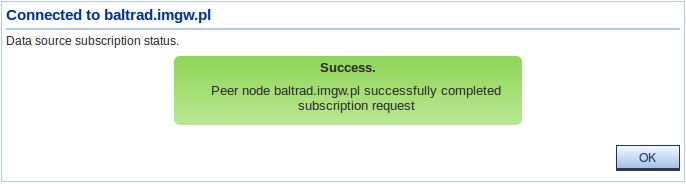
If subscription request was successfully completed, user is presented with the following message confirming the operation. Clicking \OK will redirect user to subscription status page.
Subscription status page (see image below) allows to access subscription list on per node basis, that is to access and manage subscriptions at each peer node separately. Click peer node name to access subscription management page.
Subscriptions option from Exchange group in the main menu. \endnote 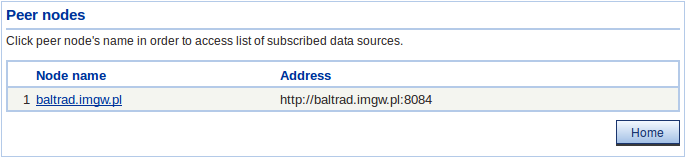
After clicking on peer node name, system displays list of data sources subscribed at this node. This page allows to modify subscription status by activating or cancelling subscription of particular data sources.
Refer to Managing subscriptions section for details.
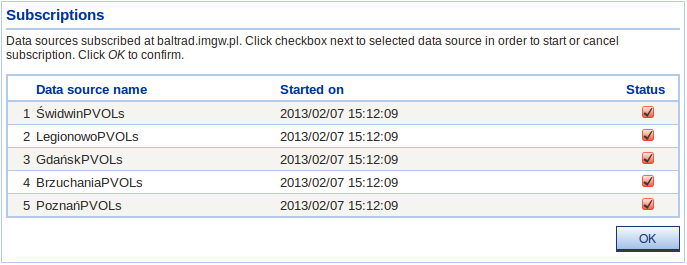
To access subcription management page, click on Subscriptions option in the main menu. Click name of desired peer node to access subscriptions available at this node. Now it is possible start or cancel subscription of a given data source. Simply check or uncheck a corresponding check box and click OK button.
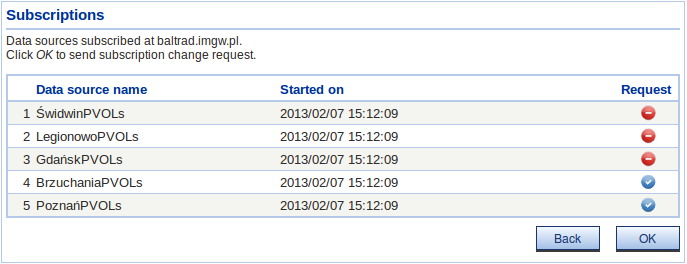
Next page shows subcription request that will be sent to the peer node and serves as a confirmation. Blue check mark denotes activating subscription, whereas red circle means that subscription of a given data source will be cancelled. Click Back to go back to selection page or OK to send subscription request.
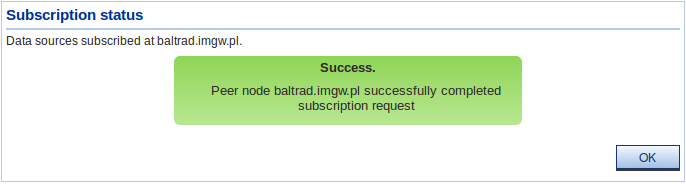
Assuming that the request was successfully posted at the peer node, the system will display the following message to confirm that subscription status was modified. Click OK to go back to initial subacription status page.
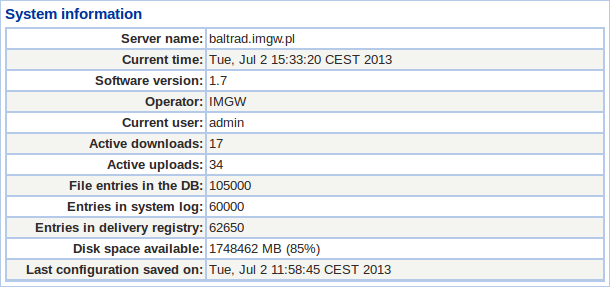
Node status data is displayed on status page which is available directly after user signs in. It is also available by clicking Status link in the main menu. Node status page is divided into 2 sections, containing different type of information.
First section, shown in the image below, presents useful information concerning the server itself, i.e: node name, software version, operator, number of entries in system log and delivery registry, as well as currently available disk space.
The second section contains information on data exchange. The information is grouped by nodes, which are currently exchanging data with the local node (see image below).
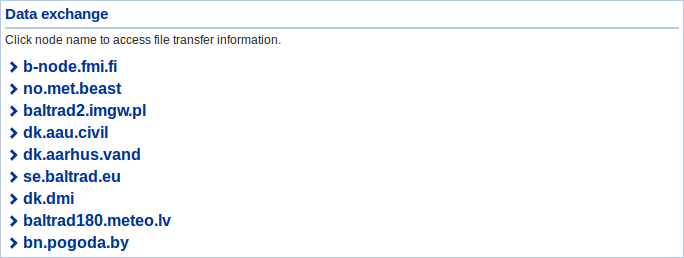
There are 2 types of data transfer:
User can check current data transfer status clicking a given node name. This reveals 2 items: Downloads and Uploads (depending on the current data exchange status), as shown in the image below.
Clicking Downloads option will display the list of data sources currently subscribed at the selected peer node. In the example below, clicking Downloads item shows list of data sources subscribed at se.baltrad.eu.
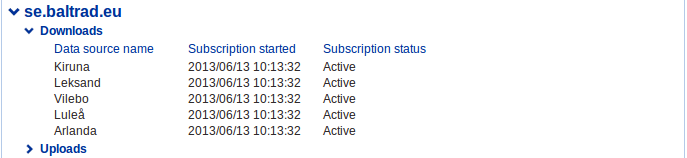
Each item on the list contains name of data source, date and and time when subscription has started as well as subscription status. If subscription status is set to Active, it means that local node is currently receiving data from a given data source. If subscription is stopped, the status control changes to Off.
By analogy, clicking Uploads item shows list of local data sources subscribed by a given peer node, in this case se.baltrad.eu, as shown below.
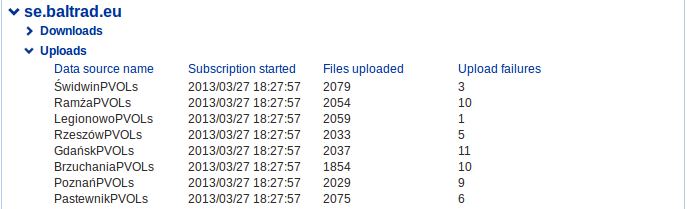
Uploads list contains information about data source name, date and time when subscription has started, number of successfully uploaded files and upload failures.
If there are active subscriptions and local node is supplied with data from local production system, user can check the status of data delivery to the peer
nodes that subscribed local data sources.
To check data delivery status, click Delivery registry link from the Exchange options group. Delivery registry page is shown in the image below.

Each entry in the registry contains timestamp, recipient (user) name, data file signature and delivery status (blue check mark denotes delivery success, red circle - failure). User can navigate through registry entries in a standard way, using either buttons with page numbers or scroll buttons.
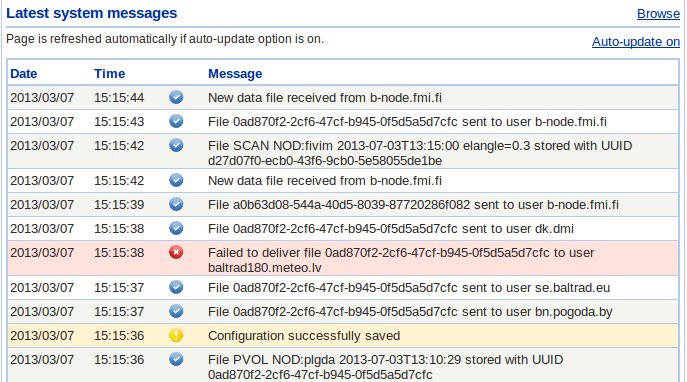
System messages interface allows to access and display detailed information on system activity. It is possible to display system messages in two modes. First mode allows to update message display automatically. Click Messages link in Node status options group of the main menu. By default, system will enter live mode, which means that the display will be automatically updated each time a new message is logged. Auto-refresh option can be turned off and on at all times by clicking Auto-update toggle.
The second mode allows to access full system log, as well as search for messages based on selected criteria. Select Messages option from the main menu, then Click Browse link placed in the upper right corner of messages screen. Upper part of the page allows to define message search criteria. The following options are available:
DEX (data exchange component), BEAST (data processing component) and PGF (product generation framework).WARN or error messages - ERROR. 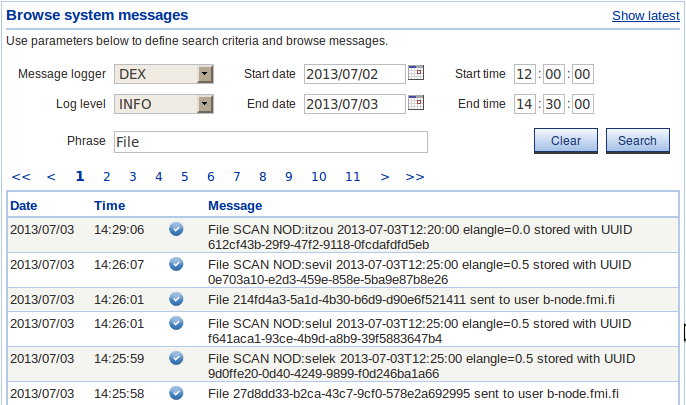
Once search options are set, click \pSelect button. Navigate through pages either clicking page numbers of scroll buttons. Click > sign to move to next page, < to move to previous page. Clicking << sign will display the first page, and >> the last page of system log. Use Reset button to reset message search options.
live messages display mode. \endnoteSticky messages serve as notification system informing user about events that require some kind of interaction. For instance, user is informed about receiving public key from a peer node. Since it is up to the user to approve or reject the key, they have to be aware that the key has been received and that it awaits further action.
First, user is informed that sticky messages have been received. This is accomplished with a special message box located in the title bar at the top of each page, as shown in the image below.

The message box will remain visible as long as at least one sticky message is available in the system.
In order access and read messages, click the link given in the message box. The system will display sticky messages in a dedicated page as shown below.
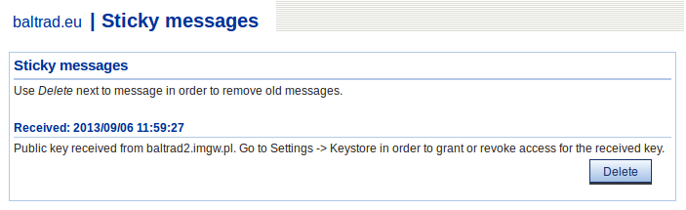
Sticky message consists of the header containing date and time when the message was received and of actual message content. The content may include some tips on the further actions that should be taken, as in case of receiving public key from a peer node.
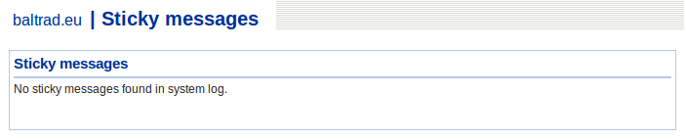
Sticky messages should be removed once it is read. To remove a sticky message, click Delete button next to it. If there are no messages remaining, notification box will be no longer visible in the title bar and the system will display the following information:
Section Data sources showed how to configure and save a data source. Existing data sources are available with Data sources link located in the main menu in Node status group. Image below shows list of data sources available in the system.
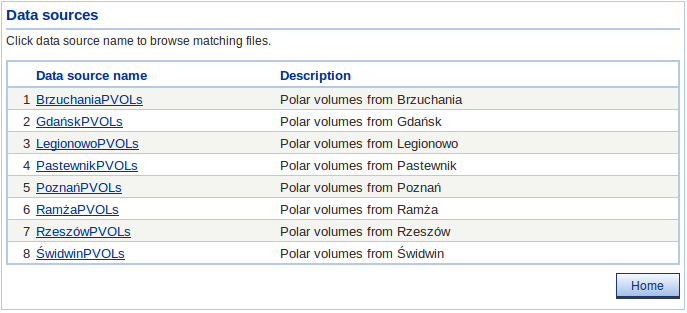
Data source interface allows to access, browse, display and download data files matching its parameters. Click on a given data source name to list the matching files. Use page numbers and scroll buttons to navigate through pages.
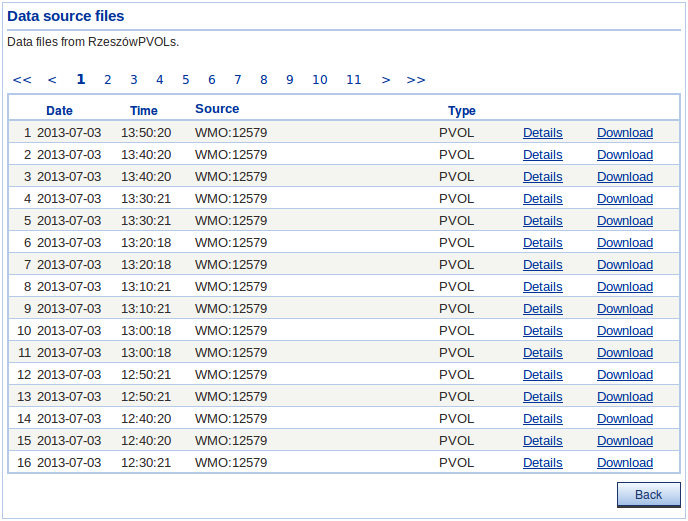
File listing page provides user with access to detailed file information and quick file preview as well as allows to download selected file. User can download selected file clicking Download link next to the given file entry. Browser will display standard file download dialog, allowing to select target storage directory. In order to display detailed information about selected file, user clicks Details option. File details page is consists of 2 sections. First section, shown in the image below, contains some basic information about data file: file signature, date, time, source ID (ID of the radar station that collected the data), storage time and data type (file object type, according to ODIM_H5 radar data information model).

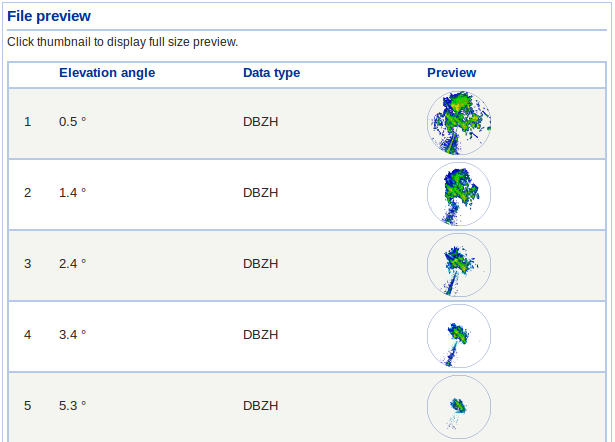
Next section displays data preview for each dataset contained in the file. A thumbnail is generated for each scan and for each data type independently (e.g. dBZH, dBZV, VRAD etc.). The example below presents data preview for volume file consisting of several scans. Each image representing a single scan is associated with information about antenna elevation angle and data type - in this case horizontally polarized reflectivity.
Next feature is full-sized data preview. Click on any image representing a single scan. The system will generate full size image based on original radar data resolution stored in files's metadata. The image will be displayed as an overlay in Google Maps interface, like in the example below.
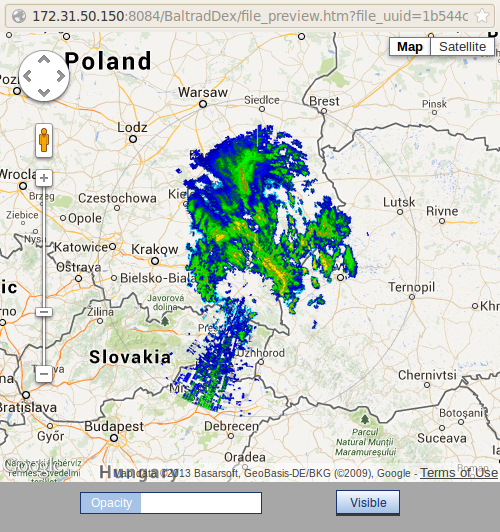
Use Opacity slider to adjust radar data layer's opacity and Toggle
visibility button to turn radar data layer on and off.
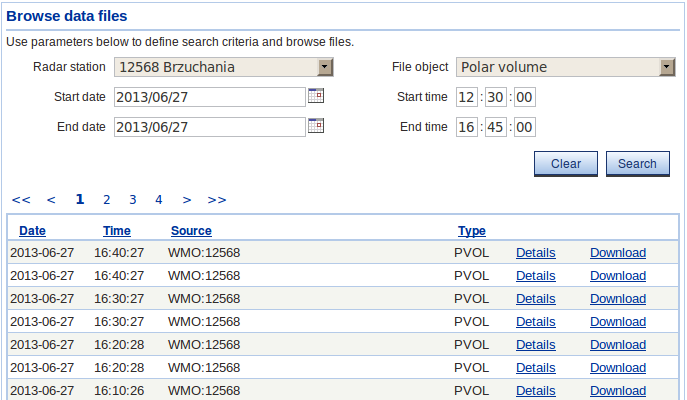
Data browsing interface allows user to browse and access radar data files in a flexible way. In order to access file browser interface, click Browse files link in Node status options group of the main menu.
There are several parameters available to specify while browsing data. The parameters include source radar station, file object type according to ODIM_H5 specification and time span. Select radar station and file object type from the drop-down lists, set dates clicking on calendar icon next to Start date and End date fields. Once parameters are set, click Select button. Files matching defined criteria will be fetched from the database.
User navigates through the list of selected files in a standard way, clicking page numbers and scroll buttons. File listing can be sorted by date, time, source and type. I order to sort the list, user clicks on the header of selected column, e.g. Source. File listing provides acces to file details page, as described in More on data sources section. Click Details to access file details and data preview page, click Download to store file on the local disk.
BaltradDex constitutes interface to data processing functionality. Data processing options are grouped in Processing tab. Refer to BALTRAD User Manual for further information.
This section addresses administrative tasks related to node management and settings. Features presented here are available in Settings menu group, which is only available for node's administrator.
Refer to Radars section.
Refer to Data sources section.
Subscription settings is useful feature in case when subscription status between two nodes is not synchronized. This situation may occur when e.g. node A subscribes data source X on node B. Then subscription status on node A is erased due to some kind of error or faulty database operation. In such case information about subscribed data source X still exists on node B, but no longer on node A. To get rid of invalid subscription, user at node B should click Subscriptions item to expand menu. Two options are available: Remove downloads and Remove uploads, by analogy to subscription types described in subscription_status. Let's say there invalid subscription of data source X at node B was discovered. User should click Remove uploads item. The following page will be displayed.
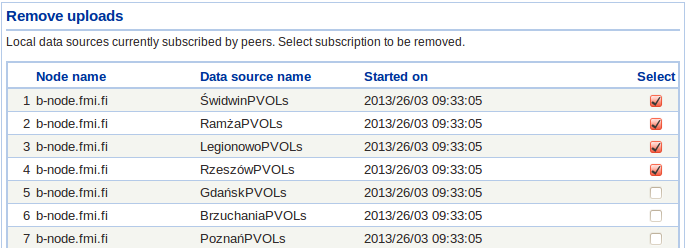
The page presents information about local data sources and respective subscribers. Click Select checkbox next to the desired subscription entry and OK to remove. User will be asked to confirm subscription removal with the following warning.
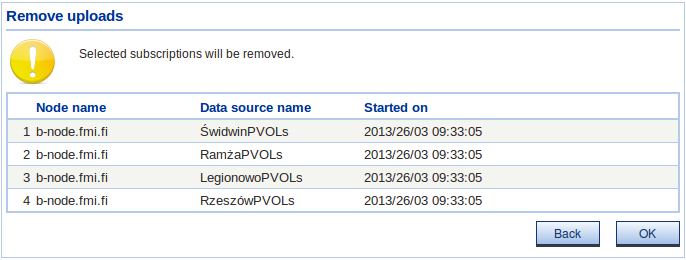
Click OK to confirm. Invalid subscription entries will be deleted.
The same operation can be performed on data downloads, that is subscriptions of data sources at peer nodes. User can remove subscriptions selecting Remove downloads option from the menu. The following page presents information about data downloads.
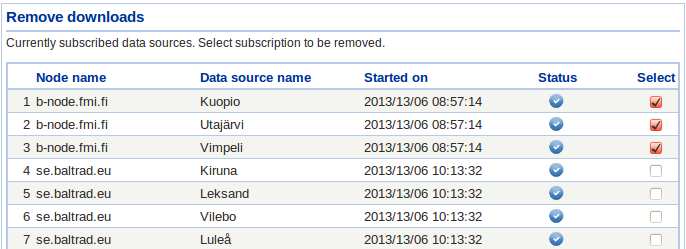
The page contains information about subscribed data sources and respective operators (peer nodes), as well as about subscription status (active /inactive). In order to remove subscription, click Select checkbox next to the desired subscription entry and OK to remove. User will be asked to confirm subscription removal with the following warning.
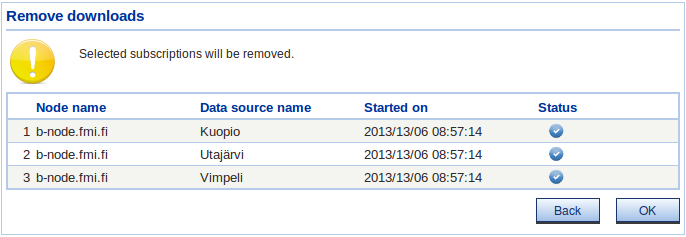
Click OK to confirm. Invalid subscription entries will be deleted.
Delivery registry settings allow to keep track of the number of delivery registry entries stored in the system. Click Delivery registry to expand available options. Configure option allows to set maximum number of delivery registry entries or maximum age of entries. See the image below.
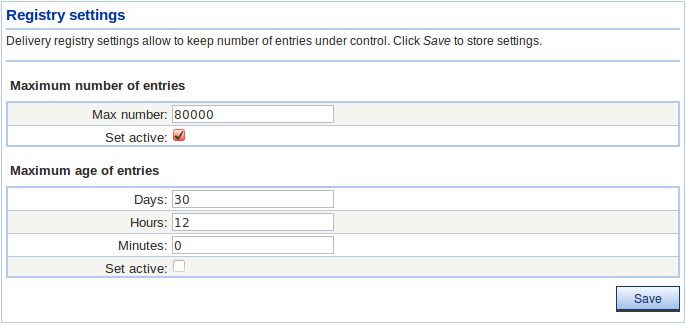
The Set active checkbox activates selected limit. If both checkboxes are checked, delivery registry entries will be deleted based on both maximum number and maximum age of entries, whichever criterion is met.
Clear option allows to immediately remove all delivery registry entries. This option should be used with care. It is recommended to set limit on either number or age of delivery registry entries instead, as described above.
System messages settings allow to keep track of the number of log entries stored in the system. Click Messages to expand available options. Configure option allows to set maximum number of log entries or maximum age of log entries. You are also able to configure the number of pages to see in the message browser scroll bar. See the image below.
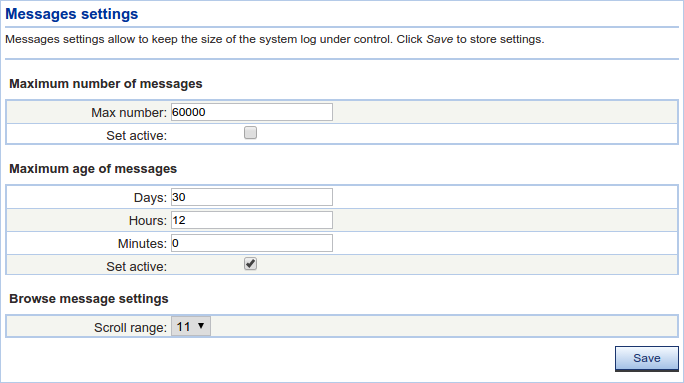
The Set active checkbox activates selected limit. If both checkboxes are checked, log entries will be deleted based on both maximum number and maximum age of log entries, whichever criterion is met.
If you are having problems seeing the full navigation bar in the browse messages view you are able to configure the number of selectable pages in the navigation bar by changing the Scroll range setting.
Clear option allows to immediately remove all log entries. This option should be used with care. It is recommended to set limit on either number or age of log entries instead, as described above.
- Adding user account
Click User accounts and Add to set new user account. System will show user account data form allowing to provide some basic user's credentials as in the example below.
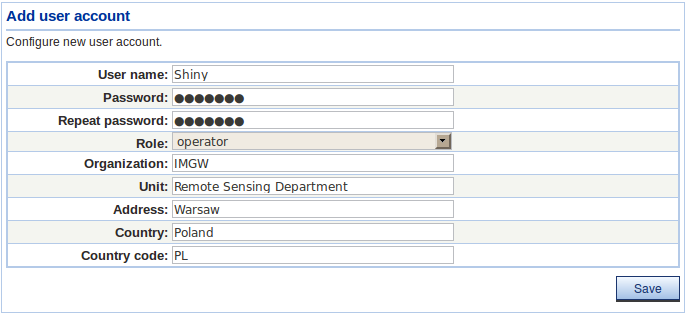
Fill in the form and click Save in order to save new user account. The system will issue an appropriate message depending on the operation status.
Role selection drop-down list. System functionality available in the GUI is different for users with particular roles. The following roles are available: user - Basic role with very limited access to the system. User with this role can browse data and system messages, access subscription and data source status information. operator - Advanced user that can connect to peer nodes as well as start and stop subscriptions and access data processing tab. This role also extends user-level functionality. admin - Node administrator with unlimited access to system options.peer - This role is reserved for data exchange and it is not available in the drop-down list. \endnote - Modifying user account setttings
Click User accounts and Edit to modify existing user account. The following form will be displayed.
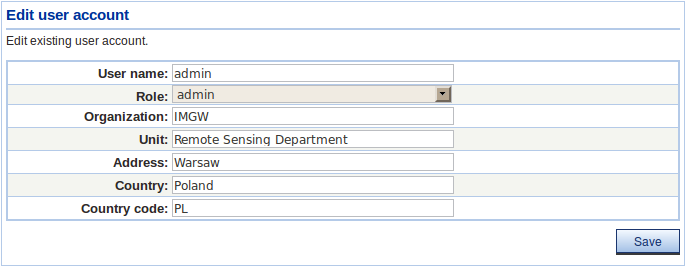
Click given user's name to access account details page. Edit account settings and click Save. The system will confirm operation with suitable message.
User's password can be modified independently from the rest of account's settings. Click User accounts, Edit, then click Change option next to the selected account. Type new password, retype to confirm and click Save. From now on user can sign in using new password.

- Deleting user account
To remove user account, click User accounts and select Remove option. The list of user accounts will be displayed.
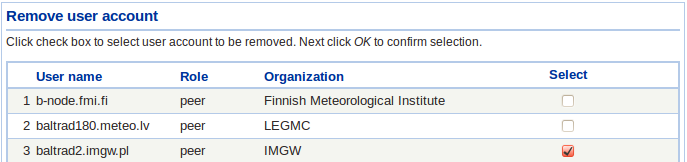
Click a checkbox next to the account that is to be removed and click OK. The system will confirm operation with suitable message.
Refer to Node settings section.