 |
Frequently Asked Questions and User Guide
|
|
Frequently Asked Questions and User Guide
|
This page contains a step-by-step tutorial on how to get your tools into the BALTRAD toolbox. It will focus on the Python Product Generation Framework (PGF) functionality available in the RAVE package described on the Processing data page.
This tutoral builds on the functional name "hello"; this is the tool that we will integrate into the toolbox. "Hello" doesn't actually do anything very useful, and the same functionality actually already exists. However, it's intended to be a simple example that can serve as a template for integrating more useful functionality.
This first step is optional, but it contains a ready-made package containing all the code, build directives, and other useful things that can be installed on top of an existing RAVE. While this may be convenient to do, it is advisable not to; instead unpack the tarball seperately and refer to it.
The "hello" code base exists as a C file (hello.c) with associated header (hello.h).
The location of these files is important. If the functionality can be considered part of the core toolbox, then it can be placed in the librave/toolbox directory. Otherwise, it's advisable to put such code in a separate directory under librave, as has been done for the scansun and radvol code.
The functionality takes an I/O container object and queries its contents, checking whether it is a scan, a polar volume, an image, or a vertical profile. It also writes a new metadata attribute to the top-level 'how' group containing a simple greeting. All this is done using the toolbox APIs.
The Makefile for the C code must be modified to build the "hello" code. Edit the existing Makefile or use it as a template.
add hello.c to $RAVESOURCES
add hello.h to $INSTALL_HEADERS
This task may seem daunting at first, but it's pretty straight-forward. Most of the code is boiler-plate, so wrappers can be recycled and used as templates a lot of the time. In the modules directory, create a wrapper called pyhello.c. In contrast to the separation between core functionality and other functionality, all the wrappers are located in this modules directory.
The function containing the wrapper itself is called _hello_func. You can see how the function maps the input object from Python to C, calls the "hello" function in the C code, and then returns the result back to Python.
Similarly with the pure C code above in C build directives, the wrapper must be built as well. Wrappers are numbered. In this tutorial, the number used for "hello" is 35. As the toolbox continues to develop, this number will be used by another module, so using a higher number will be required for "hello".
add SOURCE_35, OBJECTS_35, TARGET_35
Above ".PHONY=install", add an entry for $(TARGET_35)
Last line, add: -include $(SOURCE_35:%.c=/%.P)
After these additions, you can now build and install the C code and its Python wrapper.
This step shoudn't be forgotten, because it provides a safeguard for the functionality you are contributing. If the code base is altered in a way that breaks your tool, then it should result in failed tests that will alert you.
As with the Python wrappers, all the unit tests are located in the test/pytest directory. They are written in Python. We will contribute a module called PyHelloTest.py that contains two unit tests.
The first test testHello reads a polar volume file and determines that it is, indeed, a polar volume. The second test testGoodbye reads an improperly encoded vertical profile file and determines that it is, indeed, unrecognizable as a vertical profile.
Import this unit test module into test/pytest/RaveTestSuite.py:
from PyHelloTest import *
Run the tests from the top directory where you are building RAVE:
$ make test
This should result in a message at the end stating
Ran XXX tests in X.---s

OK
Because the "hello" functionality already exists in the toolbox, it's a piece of cake to make it available on the command line. In the bin directory, add a Python script called hello and make it executable with "chmod".
This command-line tool consists of two parts:
After the "binary" has been written, don't forget to add it to the "install:" directive in bin/Makefile.
The toolbox contains functionality for managing data processing algorithms at a high level of abstraction. These building blocks are referred to as "quality plugins". By registering plugins, they can be chained in memory automatically.
The plugin is found in Lib/rave_hello_quality_plugin.py. In addition to the constructor, it contains a name defined in the getQualityfields method. This name follows a convention that is Java-like and represents the hierarchical origin of the algorithm that can be used to identify it. This name should written to an output file's how/task attribute, but it is the responsibility of each tool to ensure this.
The registry itself is located in etc/rave_pgf_quality_registry.xml. The following entry should be added:
<quality-plugin name="hello" module="rave_hello_quality_plugin" class="hello_plugin"/>
Once this "hello" quality plugin has been registered, it can be verified using the odc_toolbox tool on the command-line. Assuming the bRopo and beamb packages have also been installed, you can set up the following:
odc_toolbox -i in -o out -q 'ropo,radvol-att,beamb,hello'Then check the output file in the "out" directory, e.g. using HDFView or h5dump. It should be larger and contain quality indicator fields from the various quality controls, including the greeting created by "hello".
In contrast to the quality plugins, PGF plugins are used by a BALTRAD node running in real time as part of the PGF server operating as a daemon. This server received XML-RPC messages containing information on which tool to run among other things. It must therefore have a mechanism for looking up these tools. This is the purpose of this kind of plugin.
In the case of "hello", its PGF plugin is found in Lib/rave_pgf_hello_plugin.py. This plugin, like all PGF plugins, must have a function called generate that takes two manadatory arguments: files and arguments. More information is available in the PGF server documentation.
Register the plugin:
$ pgf_registry -a -H http://localhost:8085/RAVE --name=eu.baltrad.beast.hello -m rave_pgf_hello_plugin -f generate -d 'Hello tutorial'
Verify:
$ pgf_registry -l -H http://localhost:8085/RAVE
Test:
This test will actually use a simple client that will connect to your PGF server and tell it to run the "hello" PGF plugin on it. The client is hello_pgf.
First, start your PGF server if it isn't already running:
$ rave_pgf start
Then using an input ODIM_H5 file, e.g. pvol.h5:
$ hello_pgf pvol.h5
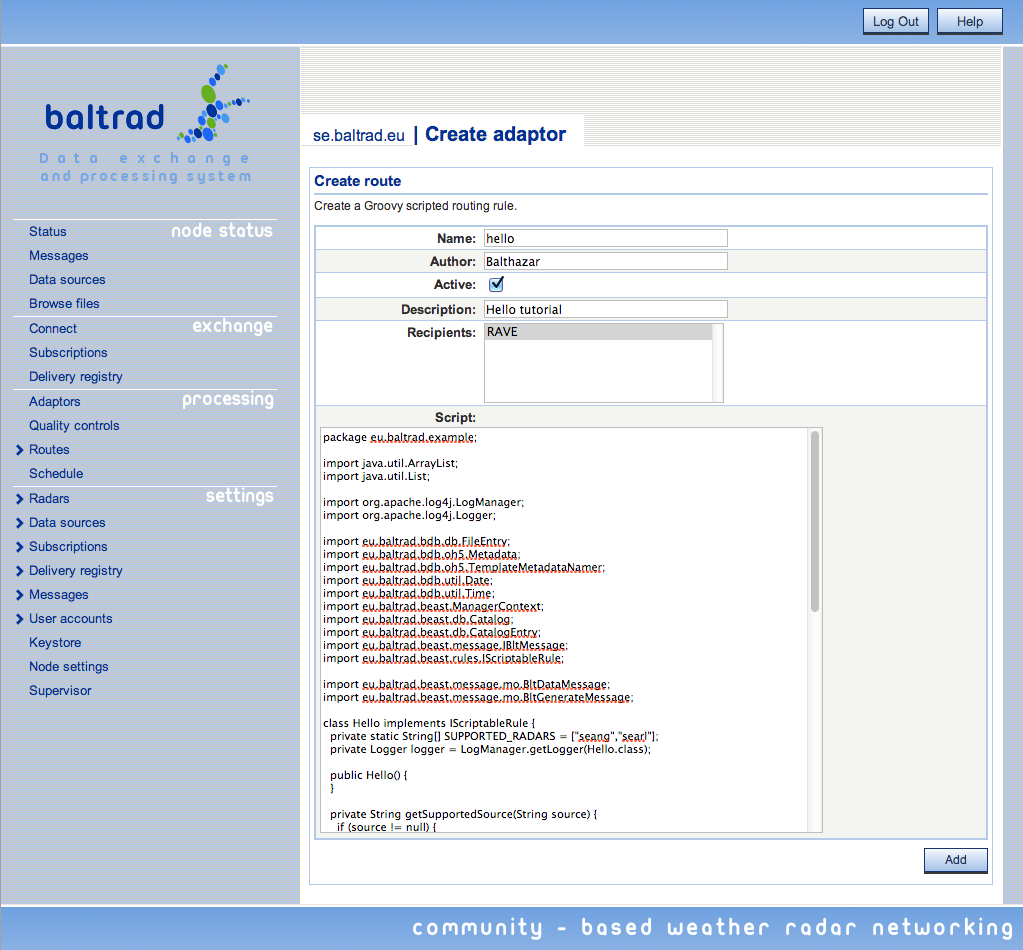
This integration is only required if you are running a toolbox as part of a real-time BALTRAD node, or plan to. Prototyping a new Route is done in the Beast sub-system of a BALTRAD node, using Groovy scripting. This can be done rather quickly. Creating a proper graphical user interface for the route takes longer, but should be done once the scripted route has been verified to function as expected. This tutorial will only cover the scripted Groovy routes.
Hello.groovy has been created for this tutorial. To activate it, in your node's user interface, create a new scipted route through the "Routes" --> "Create script" menu and paste the script text into the script field. Don't forget to click on the RAVE Recipient. When the route has been configured, press the "Add" button and the route will trigger jobs automatically in real time. In this case, the triggering criterion is the presence of a polar scan or volume from Swedish radars Ängelholm and Arlanda.
librave/toolbox contains mostly infrastructure; please keep it that way.
Add your tools in one of the following ways:
 1.7.4 for